How to Make No-Bake Cookie Monster Cheesecake Fast
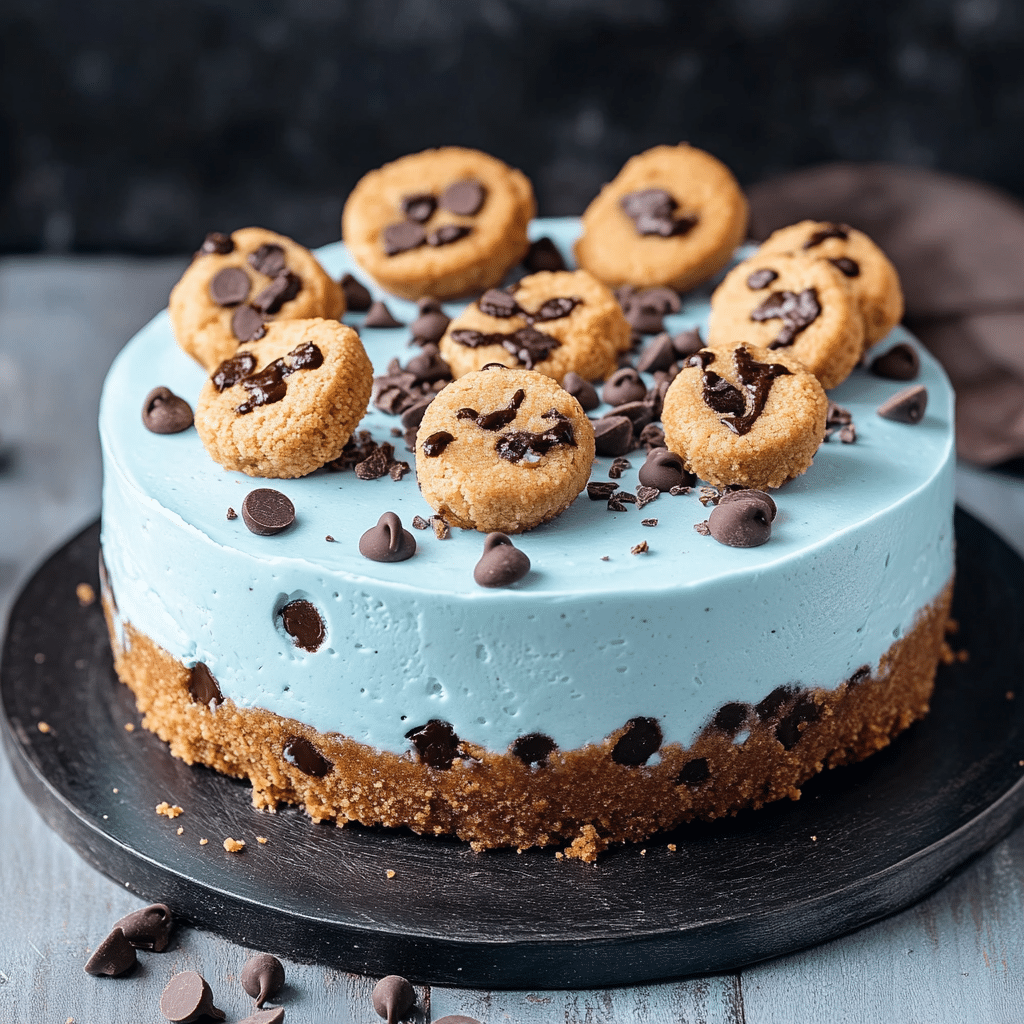
If you’re on the hunt for a dessert that combines creamy texture, playful crunch, and an absolute breeze to make, you’re going to adore this No-Bake Cookie Monster Cheesecake. This crowd-pleasing treat blends rich cream cheese with chunks of your favorite cookies, offering a fun and flavorful dessert that requires zero oven time. Whether you’re craving something quick after dinner or planning a special occasion, this recipe delivers indulgence and joy without the fuss.
Why You’ll Love This Recipe
- Speedy preparation: Ready in under 30 minutes, perfect for last-minute cravings or spontaneous gatherings.
- Zero baking needed: No need to heat up your kitchen, ideal for warm days or quick dessert fixes.
- Playful texture: The mix of creamy cheesecake and crunchy cookie chunks creates a delightful bite every time.
- Versatile flavor profile: Easily customize with your favorite cookies for endless taste variations.
- Impressive presentation: It looks as fun and delicious as it tastes, making it a conversation starter at any party.
Ingredients You’ll Need
Gathering simple, quality ingredients is the first step to making this No-Bake Cookie Monster Cheesecake unforgettable. Each component plays a crucial role in taste, texture, or appearance — from the creamy base to the colorful cookie goodies.
- Cream cheese: Provides the smooth and tangy foundation that balances sweetness beautifully.
- Whipped cream: Adds lightness and fluff to achieve that melt-in-your-mouth feel.
- Sugar: Sweetens the cheesecake just enough without overpowering the flavors.
- Vanilla extract: Enhances the flavor depth with natural warmth and aromatic notes.
- Oreos or chocolate sandwich cookies: The star cookie chunks give crunch, chocolate flavor, and visual appeal.
- Butter: Helps bind the crust together, creating the perfect base texture.
- Crushed cookie crumbs: Forms the base with buttery richness and cookie texture.
Variations for No-Bake Cookie Monster Cheesecake
This recipe is wonderfully adaptable, making it easy to tweak to your preferences or dietary needs. From switching cookie types to adding mix-ins, the No-Bake Cookie Monster Cheesecake can be personalized endlessly.
- Gluten-free twist: Use gluten-free cookies to suit gluten sensitivities without sacrificing taste or texture.
- Mint sensation: Add crushed mint chocolate cookies and a drop of peppermint extract for a refreshing variation.
- Peanut butter addition: Swirl in some creamy peanut butter to introduce a luscious nutty flavor.
- Fruit infusion: Mix in fresh berries or fruit preserves to add brightness and color contrast.
- Vegan option: Substitute cream cheese and whipped cream with plant-based alternatives to fit vegan diets.

How to Make No-Bake Cookie Monster Cheesecake
Step 1: Prepare the Cookie Crust
Start by crushing your cookies finely and mixing them with melted butter. Press this mixture firmly into the bottom of your serving pan or pie dish to create a sturdy yet tender crust foundation.
Step 2: Make the Cheesecake Filling
In a large bowl, whip together softened cream cheese and sugar until smooth and creamy. Next, fold in gently whipped cream and vanilla extract, making sure to maintain a light and airy consistency.
Step 3: Incorporate Cookie Chunks
Roughly chop additional cookies and fold them into your cheesecake filling for that signature crunch and fun “Cookie Monster” appeal in every bite.
Step 4: Assemble and Chill
Pour the creamy cookie-studded filling over the prepared crust, spreading evenly. Cover and refrigerate for at least 4 hours, or until firm enough to slice.
Step 5: Serve and Enjoy
Once chilled, garnish as desired and serve chilled for the ultimate creamy, crunchy dessert experience.
Pro Tips for Making No-Bake Cookie Monster Cheesecake
- Choose room temperature cream cheese: It blends more smoothly and prevents lumps in your filling.
- Don’t overmix: Fold ingredients gently to keep the cheesecake light and fluffy rather than dense.
- Use fresh cookies: For the best texture, crush freshly opened cookies instead of stale ones.
- Chill thoroughly: Proper refrigeration is key to achieving the perfect cheesecake set.
- Adjust sweetness: Taste your filling before chilling and add more sugar if you prefer it sweeter.
How to Serve No-Bake Cookie Monster Cheesecake
Garnishes
Brighten the presentation with crushed cookie crumbs, mini chocolate chips, or colorful sprinkles for festive vibes. Fresh fruit like raspberries or blueberries can add pops of color and natural tartness.
Side Dishes
Complement this rich dessert with light accompaniments such as a scoop of vanilla ice cream or a refreshing fruit salad for balance and added textures.
Creative Ways to Present
Try serving your No-Bake Cookie Monster Cheesecake in individual mason jars or parfait glasses layered with cookie crumbs and whipped cream for a charming, portable treat.
Make Ahead and Storage
Storing Leftovers
Store leftovers covered tightly in the refrigerator to keep the cheesecake fresh and creamy for up to 4 days without compromising texture or flavor.
Freezing
This cheesecake freezes beautifully; wrap it well with plastic wrap and foil, then freeze for up to 1 month. Thaw overnight in the fridge before serving to retain the perfect consistency.
Reheating
Since this is a no-bake, chilled dessert, reheating is not recommended. Simply enjoy it cold straight from the fridge or after thawing if frozen.
FAQs
Can I use different types of cookies in No-Bake Cookie Monster Cheesecake?
Absolutely! While classic chocolate sandwich cookies work great, feel free to experiment with peanut butter cookies, chocolate chips, or even seasonal favorites for varied flavors.
How long does the cheesecake need to set in the fridge?
A minimum of 4 hours is recommended to allow the filling to firm up properly. Overnight chilling yields the best texture and flavor melding.
Is this recipe suitable for kids?
Yes, it’s a fun, no-bake treat perfect for kids’ parties and family gatherings since it’s simple to make and doesn’t require oven use.
Can I make this into cupcakes or smaller portions?
Certainly! Divide the crust and filling into cupcake liners or small jars for cute single-serving desserts that are great for portion control and presentation.
What if I don’t have whipped cream on hand?
You can substitute with store-bought whipped topping or even heavy cream whipped to soft peaks for volume, though fresh whipped cream offers the best taste and texture.
Final Thoughts
There’s nothing quite like the joy of sitting down with a slice of creamy, crunchy, and utterly delightful No-Bake Cookie Monster Cheesecake. It’s an easy recipe that guarantees smiles and satisfied sweet cravings with minimal effort. So why wait? Give this charming dessert a try today and watch it become your new favorite indulgence.
Related Posts
- Why Chocolate Strawberry Ganache Tart Melts Hearts
- How to Make the Best Peach Upside-Down Cake
- Irresistible Peach Custard Dessert Recipes

No-Bake Cookie Monster Cheesecake
- Total Time: 4 hours 20 minutes
- Yield: 8 servings
- Diet: Gluten Free (if using gluten-free cookies)
Description
This No-Bake Cookie Monster Cheesecake is a creamy, crunchy, and delightful dessert that combines rich cream cheese with chunks of your favorite cookies. Ready in under 30 minutes and requiring no oven time, it is perfect for quick treats, parties, or any occasion where you want an indulgent, fun dessert with minimal effort.
Ingredients
Cheesecake Filling
- Cream cheese (softened) – 16 oz (450g)
- Whipped cream – 1 cup (240ml), gently whipped
- Sugar – 3/4 cup (150g)
- Vanilla extract – 1 teaspoon
- Oreos or chocolate sandwich cookies (for chunks) – 1 1/2 cups, roughly chopped
Crust
- Crushed cookie crumbs – 1 1/2 cups (about 15-20 cookies, crushed)
- Butter (melted) – 6 tablespoons (85g)
Instructions
- Prepare the Cookie Crust: Start by crushing your cookies finely and mixing them with melted butter. Press this mixture firmly into the bottom of your serving pan or pie dish to create a sturdy yet tender crust foundation.
- Make the Cheesecake Filling: In a large bowl, whip together softened cream cheese and sugar until smooth and creamy. Next, fold in gently whipped cream and vanilla extract, making sure to maintain a light and airy consistency.
- Incorporate Cookie Chunks: Roughly chop additional cookies and fold them into your cheesecake filling for that signature crunch and fun “Cookie Monster” appeal in every bite.
- Assemble and Chill: Pour the creamy cookie-studded filling over the prepared crust, spreading evenly. Cover and refrigerate for at least 4 hours, or until firm enough to slice.
- Serve and Enjoy: Once chilled, garnish as desired with crushed cookie crumbs, mini chocolate chips, sprinkles, or fresh fruit, then serve chilled for the ultimate creamy, crunchy dessert experience.
Notes
- Choose room temperature cream cheese for smooth blending and to prevent lumps.
- Don’t overmix; fold ingredients gently to keep the cheesecake light and fluffy.
- Use fresh cookies for the best cookie texture and crunch.
- Chill thoroughly for at least 4 hours to achieve the perfect set texture.
- Adjust sugar to taste before chilling if you prefer a sweeter cheesecake.
- Prep Time: 20 minutes
- Cook Time: 0 minutes
- Category: Dessert
- Method: No-Bake
- Cuisine: American
Nutrition
- Serving Size: 1 slice (approx. 1/8 of recipe)
- Calories: 350
- Sugar: 25g
- Sodium: 210mg
- Fat: 24g
- Saturated Fat: 15g
- Unsaturated Fat: 7g
- Trans Fat: 0g
- Carbohydrates: 28g
- Fiber: 1g
- Protein: 5g
- Cholesterol: 65mg
Keywords: no-bake cheesecake, cookie monster cheesecake, easy dessert, cookies and cream dessert, quick cheesecake, party dessert